Continuing my millet journey with these ragi (finger millet) idlis/idlys. I have been reading lot about how millet is good for health and fermented food can boost digestion and health. So combining both in my recipes. I have already posted recipe for jowar (sorghum) dosa , bajri (pearl millet) oats dosa. Both were gluten free and vegan. These ragi (nachani) idlis are gluten free and vegan. Ragi health benefits are unlimited because they contain a powerhouse of nutrients like dietary fiber, protein, unsaturated fat, calcium, iron, vitamin A thiamine riboflavin, niacin with all essential acids. So if you are following certain diet, these food are healthy, tasty and good for you.
Idli is like soft savory steamed rice cake. It comes from Southern part of India. But it is very famous not just in India but around the world. People eat this for breakfast with chutney. We also like this to eat during dinner with sambar or rasam. I have prepared few idli recipes in the past like regular idli, spinach idli, lobia (black eyed pea) idli, and chili idli from leftover idlis. I am always looking for idea to improve what I eat so when I saw ragi idli, I had to try it. It came out quite soft. I did not use any baking soda/soda bicarb or eno.
This recipe makes soft and spongy idlis. It only needs 3 main ingredients and few drops of oil. It can be serves as breakfast or as a main dish. This recipe serves 3 people.
Please note that you can see printable version at the end. You need to use chrome browser to print or save the copy of the recipe.
Start the preparation at least 24 hours in advance. Soak ragi, gota urad, rice and methi at least 6-7 hours and then grind and ferment the idli batter for 12-15 hours (more if you live in cold climate) in warm place.
******************************************************
Product recommended: Idli stand
*****************************************************
Preparation Time: 30 minutes
Cooking Time: 30 minutes
Ingredients:
1 cup ragi (finger millet)
3/4 cup gota urad
1/2 cup rice
1/2 tsp methi (fenugreek) seeds
1/2 cup cooked rice
Salt to taste
Little oil

Procedure:
1. Wash and soak ragi, gota urad, rice and fenugreek seeds together in the same pot 6-7 hours.
2. After ragi urad mix double in size, remove water. In a blender, grind everything to a smooth paste adding some water. Do not add too much water. This batter should not be too runny or it won’t ferment properly. If you check the batter with finger, it will feel slightly granular because of ragi, which is completely fine. Add salt to taste and mix (whisk) everything using clean hand for almost 3-4 minutes. Leave this container in a warm place until batter is fermented and double in size. Mine took around 18 hours as I live in Canada. It can be faster in warm places. If it is too cold, turn on the in oven and keep the batter inside.

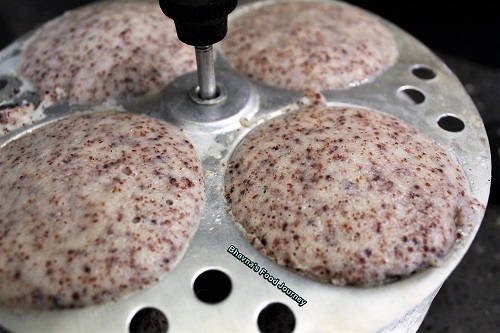
3. When ready, heat a big pot (steamer) which can fit idli stand. Add 2 glass of water and bring it to boil. Grease idli mold with little oil. Do not stir the batter at all . We have already salted the batter so no need to mix. You want to keep that froth as it is. Just take a little batter from the top with a spoon and fill each mold.
4. Put the idli stand in the steamer and steam it for at least 15 minutes. You can also use pressure cooker if it fits idli stand. Just remove the whistle and let idli steam for 15 minute.
5. After 15 minutes, turn off the heat. Let steamer cool down a bit. Then carefully remove idli stand and wait until you can handle. Unmold each idli using spoon (yes that is the easiest way to remove idli from the mold).
6. Idli taste the best when they are hot. These idlis are super delicious, it tastes much better than we eat at any restaurant. It is healthy as there is only few drops of oil used. Ragi adds interesting texture and urad dal adds the protein. You can eat these with sambhar or toor daal rasam or tomato rasam and with chana-urad dal chutney, tomato chutney and coconut chutney,. If there are left over idlis, you can make fried idli, chili idli, etc.


I would love to know if you tried making these idlis at home and do share your experience with me 🙂
Please leave a comment or let me know if you have any questions.
Thank you for visiting my website. Until next time!
You can follow me on social media using any of the link below.
Facebook Bhavna’s Food Journey
YouTube Bhavna’s Food Journey
Twitter @BhavnasFoodJrny
Pinterest Bhavna’s Food Journey
Instagram Bhavna’s Food Journey
Soft and Spongy Ragi Idli
Start the preparation at least 24 hours in advance. Soak ragi, gota urad, rice and methi at least 6-7 hours and then grind and ferment the idli batter for 12-15 hours (more if you love in cold climate) in warm place.
Product recommended: Idli stand
Ingredients:
1 cup ragi (finger millet)
3/4 cup gota urad
1/2 cup rice
1/2 tsp methi (fenugreek) seeds
1/2 cup cooked rice
Salt to taste
Little oil
Procedure:
1. Wash and soak ragi, gota urad, rice and fenugreek seeds together in the same pot 6-7 hours.
2. After ragi urad mix double in size, remove water. In a blender, grind everything to a smooth paste adding some water. Do not add too much water. This batter should not be too runny or it won’t ferment properly. If you check the batter with finger, it will feel slightly granular because of ragi, which is completely fine. Add salt to taste and mix (whisk) everything using clean hand for almost 3-4 minutes. Leave this container in a warm place until batter is fermented and double in size. Mine took around 18 hours as I live in Canada. It can be faster in warm places. If it is too cold, turn on the in oven and keep the batter inside.
3. When ready, heat a big pot (steamer) which can fit idli stand. Add 2 glass of water and bring it to boil. Grease idli mold with little oil. Do not stir the batter at all . We have already salted the batter so no need to mix. You want to keep that froth as it is. Just take a little batter from the top with a spoon and fill each mold
4. Put the idli stand in the steamer and steam it for at least 15 minutes. You can also use pressure cooker if it fits idli stand. Just remove the whistle and let idli steam for 15 minute.
5. After 15 minutes, turn off the heat. Let steamer cool down a bit. Then carefully remove idli stand and wait until you can handle. Unmold each idli using spoon (yes that is the easiest way to remove idli from the mold).
6. Idli taste the best when they are hot. These idlis are super delicious, it tastes much better than we eat at any restaurant. It is healthy as there is only few drops of oil used. Ragi adds interesting texture and urad dal adds the protein. You can eat these with sambhar or toor daal rasam or tomato rasam and with chana-urad dal chutney, tomato chutney and coconut chutney,. If there are left over idlis, you can make fried idli, chili idli, etc.

Hi. At what stage should the cooked rice be added ? Post grinding and when set aside for fermentation?
LikeLiked by 1 person
I add it while grinding so they blend well with urad dal and ragi.
LikeLike
hi Bhavna, where do u get whole ragi in Canada/US ?
LikeLiked by 1 person
Hi Sangee, I found most of the whole millet in this store. https://trupti.ca/
LikeLike
Forgot to mention, it’s in Toronto, Canada
LikeLike
Thanks Bhavna !
LikeLike
What to do with cooked rice in ragi idly recipe?
LikeLike
It helps in fermentation and makes idli very soft. You can replace that with soaked poha.
LikeLike