This is the first time I decided to prepare khichiya papad/papadum (rice flour fryums or crisps) by myself at home here in Canada. It is extremely hot here and I had few days off so I decided to try it. I asked my mom and my sister the recipe and rice flour and water proportion. So I made the small batch first (around 45 papad) and I thought it was too easy as I was using Kitchen Aid stand mixture to knead the dough and tortilla maker to roll (press) the papad. So immediately I started second batch and they came out absolutely amazing. The next day I prepared my third batch. I made almost 150 papad in 2 days. I feel like I became expert now as I have proper measurement and experience for making perfect papad. I tried to make only 45-50 papad at a time. When my mom came many years back she prepared a lot for us. Then 2 years back my sisters and sister-in-law came here to stay with me, they also made a lot. It lasted until now. Whenever I was out of stock, I bought from store but we found it very spicy.
I enjoyed this so much so I decided to share it with you all. This recipes prepares around 45-47 papad (papadum). It takes about 2 days to completely dry these papad under hot Sun.
Tips:
– Make small batch at a time
– Use machines like tortilla maker, stand mixer (if available)
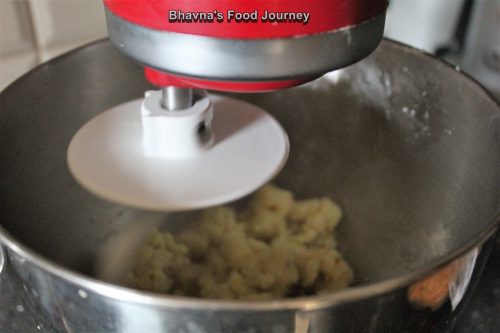
– Prepare in the evening and let it dry under fan overnight then sun dry next day
Please note that you can see printable version at the end. You need to use chrome browser to print or save a one pager copy of the recipe.
**********************************
Product recommended:
Tortilla maker KitchenAid Stand Mixer
*********************************


Preparation Time: 45 minutes
Cooking Time: 25-30 minutes
Ingredients:
3 cup (500g) fine rice flour
2 tbsp (20g) potato starch or tapioca (sabudana) starch (optional)
5 (850g) cup water
1 tsp (5g) papad khar
2 tsp (10g) salt
1 tbsp cumin seeds slightly crushed
1 tbsp sesame seeds
1 tsp chili flakes or green chili paste (optional)
Procedure
1. In a bowl, mix rice flour, potato starch (optional), crushed cumin, sesame seeds and chili flakes.
2. Boil 5 cup of water in a pot. Add salt and papad khar while water is boiling. If you are using green chili paste, then add in boiling water. You can taste the water for salt. Don’t add too much salt as after papad dries out they taste more salty. When water start to boil, turn off the heat.
3. Add rice flour mix in to boiling water and mix with rolling pin or fork. Be very careful as water is very hot. Mix water and flour properly. Transfer this mixture in charni/chalani (plate with holes).
4. Prepare steamer with 2 glass of water. When water in the steamer is hot, put chalani with dough in it for steaming. Cover with lid and steam for 20 minutes. When done, turn off the heat.


5. This is a tricky part, you have to knead the dough properly when it is still hot. Dough needs to be smooth. I used stand mixer. I put half of steamed dough in mixture, using spiral dough hook, run it for 7-8 minutes while scrapping the sides every now and then. When one batch was done, I removed in a big bowl and put other half in mixer for kneading. The dough which was already kneaded, I started making smooth small balls (around 45-47 balls). You can use little oil to make smooth balls but don’t use much as oil can smell after few months where as papad can be stored for a year or even longer. Prepare all balls and keep them covered so they don’t dry out.

6. Soon, start rolling thin papad. You can cover the flat surface with plastic wrap and then roll papad using rolling pin so you won’t need much oil. I used my electric tortilla maker but without plugging it (without heating). I covered both side of surface with thin plastic wrap and slightly oiled surface once. I had to press tortilla maker twice to get thin papad. It worked like a magic!

Watch here
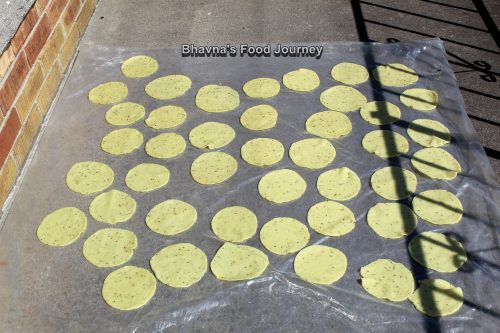
7. While you are rolling papad, someone has to lay them on plastic sheet right away under the Sun. If you are making it in the evening, keep it under the fan until morning and then put it under hot Sun for at least 2 days. You need to make sure papad are completely dried (no moisture at all) to store them for more than a year. Store them in clear airtight container.

8. When you want to eat papad, you can either roast them on direct gas flame or microwave for around 45-50 seconds. You can also fry them and they almost tripled in size. Adding potato or tapioca starch which will add extra crispiness to the papad.
Here is the fried papad, which tripled in size.

This is roasted papad, which doubled in size.

This papad goes well with any Indian meal but mostly Gujarati meal. We enjoy eating this with khichdi and kadhi or dal and rice. You can also serve this as a snacks with masala chai. Khichiya papad has wonderful flavour of cumin. I would highly recommend this if you haven’t tried it before.
Please do leave a comment or let me know if you have any questions regarding this recipe.
Thank you for visiting my website. Until next time!
Check out my Facebook page and like the page to receive the latest recipes in your news feed! You can click on the link below to follow me.
Facebook Bhavna’s Food Journey
YouTube Bhavna’s Food Journey
Twitter @BhavnasFoodJrny
Pinterest Bhavna’s Food Journey
Instagram Bhavna’s Food Journey
Khichiya Papad
Preparation Time: 45 minutes
Cooking Time: 25-30 minutes
Ingredients:
3 cup fine rice flour
2 tbsp potato starch (optional)
5 cup water
1 tsp papad khar
Salt to taste
1 tbsp cumin seeds slightly crushed
1 tbsp sesame seeds
1 tsp chili flakes or green chili paste (optional)
Procedure
1. In a bowl, mix rice flour, potato starch (optional), crushed cumin, sesame seeds and chili flakes.
2. Boil 5 cup of water in a pot. Add salt and papad khar while water is boiling. If you are using green chili paste, then add in boiling water. You can taste the water for salt. Don’t add too much salt as after papad dries out they taste more salty. When water start to boil, turn off the heat.
3. Add rice flour mix in to boiling water and mix with rolling pin or fork. Be very careful as water is very hot. Mix water and flour properly. Transfer this mixture in charni/chalani (plate with wholes).
4. Prepare steamer with 2 glass of water. When water in the steamer is hot, put chalani with dough in it for steaming. Cover with lid and steam for 20 minutes. When done, turn off the heat.
5. This is a tricky part, you have to knead the dough properly when it is still hot. Dough needs to be smooth. I used stand mixer. I put half of steamed dough in mixture, using spiral dough hook, run it for 7-8 minutes while scrapping the sides every now and then. When one batch was done, I removed in a big bowl and put other half in mixer for kneading. The dough which was already kneaded, I started making smooth small balls (around 45-47 balls). You can use little oil to make smooth balls but don’t use much as oil can smell after few months where as papad can be stored for a year or even longer. Prepare all balls and keep them covered so they don’t dry out.
6. Soon, start rolling thin papad. You can cover the flat surface with plastic and then roll papad using rolling pin so you won’t need much oil. I used my electric tortilla maker but without plugging it (without heating). I covered both side of surface with thin platsic wrap and slightly oiled surface once. I had to press tortilla maker twice to get thin papad. It worked like a magic!
7. While you are rolling papad, someone has to lay them on plastic sheet right away under the Sun. If you are making it in the evening, keep it under the fan until morning and then put it under hot Sun for at least 2 days. You need to make sure papad are completely dried (no moisture at all) to store them for more than a year. Store them in clear airtight container.
8. When you want to eat papad, you can either roast them on direct gas flame or microwave for around 45-50 seconds. You can also fry them and they almost tripled in size. Adding potato or tapioca starch which will add extra crispiness to the papad.
This papad goes well with any Indian meal but mostly Gujarati meal. We enjoy eating this with khichdi and kadhi or dal and rice. You can also serve this as a snacks with masala chai. It has wonderful flavour of cumin. I would highly recommend this if you haven’t done it before.

if you don’t have khar papad you can use bicarbonate soda.
LikeLiked by 1 person
I have never tried that but it should work.
LikeLike
Hi Bhavna, My Papdi tastes amazing. The only problem is only puffs while frying. I tried roasting but it didn’t puff. Please tell me why is that.
LikeLiked by 1 person
Thanks for trying papad recipe. Usually it puffs more while frying compare to roasting. You can roast using gas stove or microwave. Hope this helps!
LikeLike
Which brand rice flour did you use or recommend ? I tried making before and all papad broke after drying.
LikeLiked by 1 person
I buy Trupti brand here in Toronto. I think breaking papad is more to do with proper steaming. Steam the dough for 20-25 minutes. Also dry under hot sun.
LikeLike
I believe that the “”chami chalani” plate thing has HOLES—-not WHOLES
LikeLike
Thank you, I have corrected the spelling
LikeLike
Can I use a food processor instead of stand mixer?
LikeLike
If you have dough kneader then yes, or you can use hands.
LikeLike
What papad khar?
LikeLiked by 1 person
It’s like soda, used in making papad
LikeLike
In Canada instead of potato starch u can use topioca powder that’s call sabudana powder any Chinese store or regular grocery store available.
LikeLiked by 1 person
Yes, I did that in one of my batch. It works great. I was out of tapioca starch, so I ended up grinding sabudana in grinder and used it. Thanks
LikeLike
Where can I get papad khar and potato starch in US
LikeLiked by 1 person
Hi Suruchi, I see potato starch in many Canadian grocery store especially in baking isle so try in regular grocery store in US, anyway it is optional so don’t worry about it. Papad khar will be available in Indian stores.
LikeLike